Cardboard is one of those materials that most of us take for granted. We use cardboard boxes for storing and shipping items, only to break them down and toss them in the recycling bin when we’re done. But cardboard can be surprisingly versatile if you know how to manipulate it. With a few simple techniques, you can transform cardboard into durable, rigid shapes that can be used for everything from kids’ crafts to home improvement projects. The key is learning what makes cardboard rigid or flexible so you can alter its properties to suit your needs.
In this guide, I’ll walk you through the steps and techniques for turning ordinary cardboard into hard, durable cardboard that can withstand a substantial amount of force and hold its shape. Let’s start by looking at why cardboard acts stiff or bendy, and how its structure plays a role.
Cardboard Composition: What Makes It Hard or Soft

On a basic level, cardboard consists of three layers:
- Corrugated Center: The bumpy, ridged middle layer that looks like a series of peaks and valleys. This is sandwiched between the two outer layers.
- Inner Liner: A smooth paper layer on one side of the corrugated center.
- Outer Liner: Another smooth paper layer on the other side.
The corrugated center is what gives cardboard its flexibility and cushioning ability. When force is applied, the fluted shape allows it to crumple and compress.
When aiming to enhance the rigidity and stiffness of cardboard, the key lies in modifying its internal structure to deter bending. One intriguing approach to achieve this is to discover how to harden cardboard. By exploring methods that reinforce the cardboard fibers or introduce additional supportive elements, we can potentially transform its flexibility into a more robust and rigid form. This alteration in the internal composition of the cardboard holds the potential to provide the desired structural integrity, making it less prone to bending and more suitable for applications requiring increased stiffness.
There are a few ways we can approach this:
Method 1: Flatten the Corrugated Layer
By squashing down all those bumpy ridges in the corrugated center, we can eliminate the accordion-like shape that gives cardboard its flex. This fuses the inner and outer liners together into one solid slab that resists bending.
Method 2: Add a Filler Material
We can pour a hardening substance into the space between the corrugated layer and liners. As it dries, this forms a firm, stiff insert that prevents the liners from bending. Papier maché pulp or plaster are common choices.
Method 3: Reinforce With an Additional Layer
Adding a rigid sheet of wood, plastic, or metal on one side of the cardboard creates a reinforced panel that won’t flex easily. The corrugated center still allows some bend, but the added layer resists it.
Now that we understand the science behind cardboard rigidity, let’s look at practical techniques for hardening cardboard at home without special tools.
Making Hard Cardboard By Hand
While you can use a hydraulic press to flatten and laminate layers of cardboard into a dense block, this isn’t practical for DIY home use. But don’t worry – you can still transform cardboard into a hard, stiff panel using common household items and a bit of elbow grease.
Here are some simple methods for manually making hard cardboard:
Flatten Boxes Underweight
This straightforward technique compresses the corrugated medium to remove the ridges and fuse the liners.
What You’ll Need:
- Cardboard boxes of any size – the sturdier the better
- Heavy objects like books, dumbbells, etc. The heavier, the better.
- Waxed paper or parchment paper (optional)
Step 1: Break down boxes so you have flat sheets of cardboard. Cut or tear into pieces if needed to make them easier to work with.
Step 2: Place the cardboard with the corrugated layer facing up. Optional – lay a sheet of waxed or parchment paper on top to prevent sticking.
Step 3: Stack heavy objects on top to compress the cardboard. Focus weight on certain areas to flatten ridges and peaks. Leave overnight or up to 24 hours.
Step 4: Remove weights and cardboard. It should now be stiff and resistant to bending where compressed.
The longer you apply weight, the better this works to crush the corrugated layer. Adding books or dumbbells focuses concentrated force. You can repeat the process on any unflatten sections.
Laminate With Adhesive
Using adhesive laminates multiple layers into a rigid sheet. White glue works best for cardboard.
What You’ll Need:
- Cardboard sheets
- White glue or adhesive like Mod Podge -Heavy books or weights
- Waxed paper (optional)
Step 1: Layer 2-3 sheets of cardboard in a stack with adhesive between each. Offset seams so they don’t align.
Step 2: Top with waxed paper or foil and weights. Allow several hours for glue to set.
Step 3: Remove laminated cardboard and peel off paper. Let dry completely.
The adhesive bonds the corrugated layers together while also hardening as it dries. More layers = more rigidity and strength.
Harden With Papier Mâché Pulp
You can use paper pulp as a filler to turn corrugated cardboard into a dense, stiff panel.
What You’ll Need:
- Cardboard with corrugated layer (boxes or sheets)
- Paper pulp mixture – see instructions below
- Heavyweight objects
To Make Papier Mâché Pulp:
- Shred or tear paper into small bits. Newspaper or computer paper works well.
- Add 2 parts paper to 1 part water in a blender. Mix at high speed for 1 minute to break down fibers.
- Optional – add white glue while blending for extra strength. Use 2 parts pulp to 1 part glue.
Steps:
- Cut cardboard to size you want the finished piece to be.
- Flip so corrugated side faces up. Outline the edges with duct tape to create a dam.
- Pour prepared paper pulp into the corrugated layer to fill it. Smooth the surface.
- Place heavy objects on top and let pulp dry completely, up to 48 hours.
- Once dry, remove weights and cardboard will be rigid where pulp has hardened in the corrugated layer.
The dried papier mâché pulp forms a strong, stiff insert that prevents bending. Thicker cardboard works best to resist moisture from the pulp.
Harden With Plaster
For an ultra-stiff result, fill corrugated voids with plaster like Hydrosome. It dries into a cement-like insert.
What You’ll Need:
- Cardboard sheet with taped edges
- Hydro stone plaster or Plaster of Paris
- Waxed paper or plastic sheet
- Mixing container and spoon
Steps:
- Prepare plaster mix per package instructions. Consistency should be pourable but not watery.
- Prop up cardboard so corrugated layer faces up. Tape edges to create dams.
- Pour plaster into the corrugated voids. Smooth the surface with a board or spoon.
- Lay waxed paper or plastic wrap over the top. Smooth again.
- Allow plaster to fully set and dry per package directions, usually 24-48 hours.
- Once hardened, remove cardboard. It will now be extremely rigid and durable.
The plaster works similar to papier mâché pulp but results in an even harder, stronger fill material. This works great for structural applications.
Cardboard Hardeners: Chemicals and Treatments
In addition to physical techniques, there are chemical methods for stiffening cardboard. These include:
Wood glue – Brush or roll carpenter’s wood glue onto cardboard. It soaks into fibers and hardens to add stiffness once dry.
Spray adhesives – Aerosol spray adhesives permeate cardboard quickly and bond layers together as they dry.
Polymers – Liquid polymers like epoxy resin can be poured or brushed into corrugated layers and harden quickly. Adds significant strength and moisture resistance.
Shellac – An alcohol-based wood finish that stiffens cardboard as it penetrates and dries. Best for small pieces.
Varnish/polyurethane – Oil-based varnishes and polyurethane coatings add a protective film while also stiffening the underlying cardboard.
Sizing – Brush sizing fluid is designed to reinforce and strengthen paper. Often made from gelatin, glue, and chemicals.
When applying liquid hardeners, working in a ventilated area is recommended. Seal treated cardboard between layers of plastic wrap and flatten with a board and weights to soak into corrugations and bond layers.
Shaping Hardened Cardboard
Once cardboard is made rigid, you can cut, shape, and join pieces to create custom 3D objects that hold their form. Here are some tips:
- Score or crease along bend lines before assembling so it folds cleanly at joints without cracking.
- Use angular braces made from wood or plastic corner bead to reinforce corners and angles. Glue in place.
- Drill pilot holes before inserting screws to prevent tear out. Use washers to prevent pull through.
- Use cardboard-safe adhesives like white glue, epoxy, or contact cement. Apply to both surfaces.
- For long-lasting outdoor projects, seal with polyurethane or fiberglass resin to weatherproof.
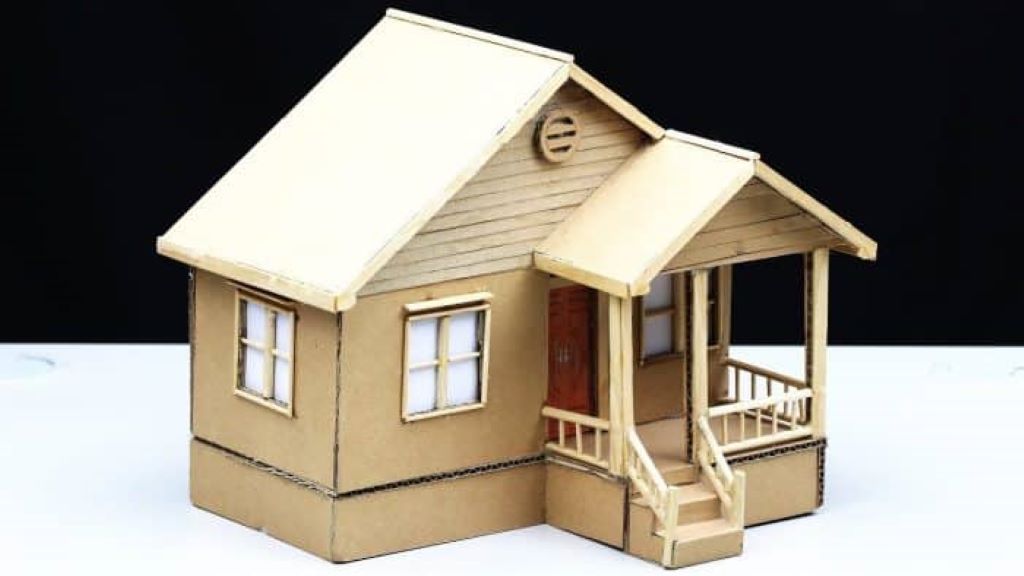
With these techniques, you can build durable structures like furniture, outdoor planters, cat trees, playhouses, and more. The possibilities are endless!
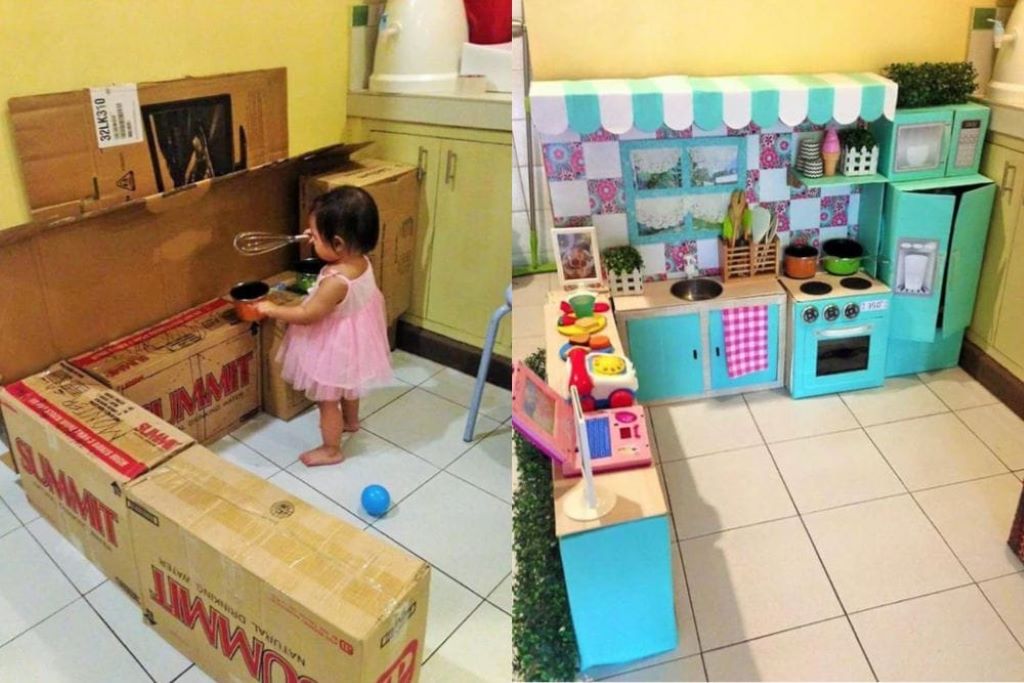
Turning Trash Into Treasure: Upcycling Cardboard Scraps
Don’t throw away small cardboard scraps and damaged boxes – they can be upcycled into hardened cardboard for crafts and home projects using the methods above. Here are some ideas:
- Make recyclable planters for seedlings and cuttings. Just form into a pot shape and harden.
- Fashion beds, tunnels, and play cubes for small pets like hamsters using recycled boxes.
- Create lightweight backdrops and photography props from large boxes like appliances came in.
- Form broken down packaging into jewelry trays, desk organizers, magazine holders, etc.
- Compress shredded junk mail or paper into a pulp to use as cardboard filler and strengthener.
- Laminate cereal box fronts, product labels, and more into durable keepsakes or gifts.
Repurposing corrugated scraps that would otherwise be tossed gives them new life! With a bit of creativity, you can upcycle all kinds of cardboard into DIY projects.
Tips for Best Results Hardening Cardboard
Follow these tips to ensure your efforts transforming cardboard into rigid, durable sheets and objects are successful:
- Use heavy boxes like moving or appliance boxes which are thicker and denser. Avoid thin cardboard.
- Flatten ridges and peaks thoroughly when compressing under weight. Leave for 24-48 hours.
- Check for unflattened sections and re-compress if needed for uniform stiffness.
- Offset inner corrugated seams when laminating sheets to prevent weak points.
- Apply even pressure and weight when drying laminated or treated cardboard.
- Let adhesives, pulp, plaster and other fillers dry fully before removing weights.
- Work in sections for large or complex cardboard structures.
- Seal outdoor projects with polyurethane or epoxy to weatherproof.
- Prime before painting for best adhesion on slick cardboard surfaces.
With the right techniques and a little trial and error, you can turn cardboard destined for the recycling bin into useful material for all kinds of applications!
FAQs
What types of cardboard work best?
Sturdy, thick moving or appliance boxes are ideal. Avoid thin cardboard from cereal boxes or packaging which lacks durability.
What can I use instead of weights?
Books, dumbbells, bricks, jugs of water, or any other dense objects to apply concentrated pressure.
How long should I leave the weights on?
24-48 hours for best results. Check periodically, adding more weight to flatten ridges.
What’s the best homemade pulp mixture?
A 2:1 ratio of shredded paper to water blended into a thick pulp. Add white glue for strength.
Can this cardboard get wet or be used outdoors?
Untreated cardboard will degrade with moisture. Seal with polyurethane or fiberglass resin for weatherproofing.
Summary
The key to turning ordinary corrugated cardboard into a hard, durable material comes down to altering its internal structure. By crushing the fluted medium, laminating with adhesive, or using fillers like paper pulp or plaster, you can create a stiff panel perfect for DIY projects. While you can buy specialty hardboard products, with a few basic supplies and techniques, anyone can learn how to make rigid cardboard at home.
Whether you need hard cardboard for kids’ forts, shop fixtures, insulation backing, industrial prototypes, or other applications, the methods in this guide will save you money and prevent useful materials from going to waste. With some experimentation and creativity, you can upcycle scraps into whatever unique shapes your projects require, including crafting a charming hanging basket with yarn. So next time you’re about to recycle cardboard, consider the potential uses if you make it hard and rigid first!