If you’re experiencing a clogged bathtub drain or need to replace an old drain, knowing how to remove a tub drain is an essential skill that can save you time and money. By following a few simple steps, you can easily tackle this task without the need for professional assistance. In this guide, we’ll take you through the process of removing a tub drain, providing you with the necessary knowledge to complete the job effectively.
Tools and Materials Needed
To successfully remove a tub drain, you’ll need a few tools and a bathtub drain diagram. Here’s a list of items you should gather before starting the process:
- Screwdriver (flathead or Phillips, depending on the type of screws)
- Pliers (regular and needle-nose)
- Tub drain removal tool (optional but recommended)
- Putty knife or scraper
- Plumbers tape or sealant
- Replacement drain assembly (if needed)
Having these tools readily available will make the removal process smoother and more efficient.
Preparing for the Removal
Before getting started, it’s important to clear the area around the tub to create a workspace. Remove any bath products, shower curtains, or items that might hinder your access to the drain. By having a clean and clutter-free area, you’ll have better visibility and maneuverability during the process.
Next, gather all the tools and materials you’ll need for the removal. Keeping everything within reach will save you time and prevent unnecessary interruptions during the procedure.
Step-by-Step Guide: Removing a Tub Drain
Now, let’s dive into the step-by-step process of removing a tub drain. Follow these instructions carefully to ensure a successful removal:
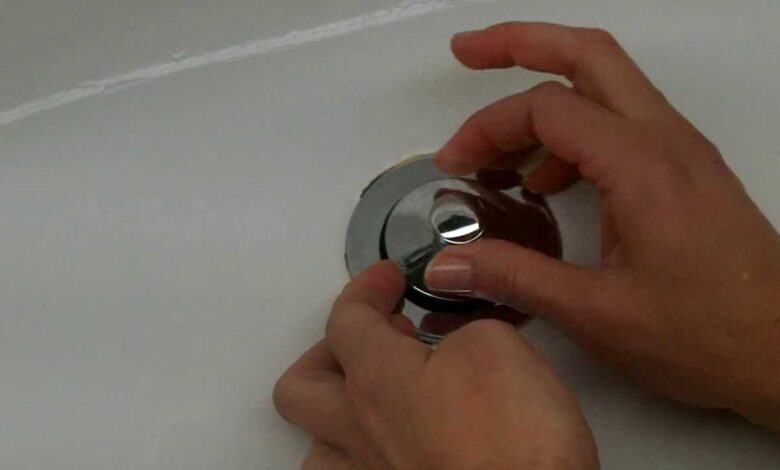
- Locating the drain stopper
The first step in removing a tub drain is locating the drain stopper. Look for a small plate or lever on the overflow cover of your bathtub. This is where the stopper mechanism is usually located. Some stoppers are operated by a lever, while others have a twist-and-pull mechanism.
- Removing the drain stopper
Once you’ve located the drain stopper, remove it by unscrewing or unhooking it, depending on the type. If it’s a lever-operated stopper, unscrew the retaining screw and lift it out. For twist-and-pull stoppers, twist counterclockwise and pull it out of the drain.
- Removing the overflow plate
After removing the drain stopper, you’ll need to remove the overflow plate. This plate is typically located below the faucet and is attached to the bathtub overflow drain. Use a screwdriver to unscrew the screws holding the plate in place. Once the screws are removed, carefully pull the plate away from the wall of the tub.
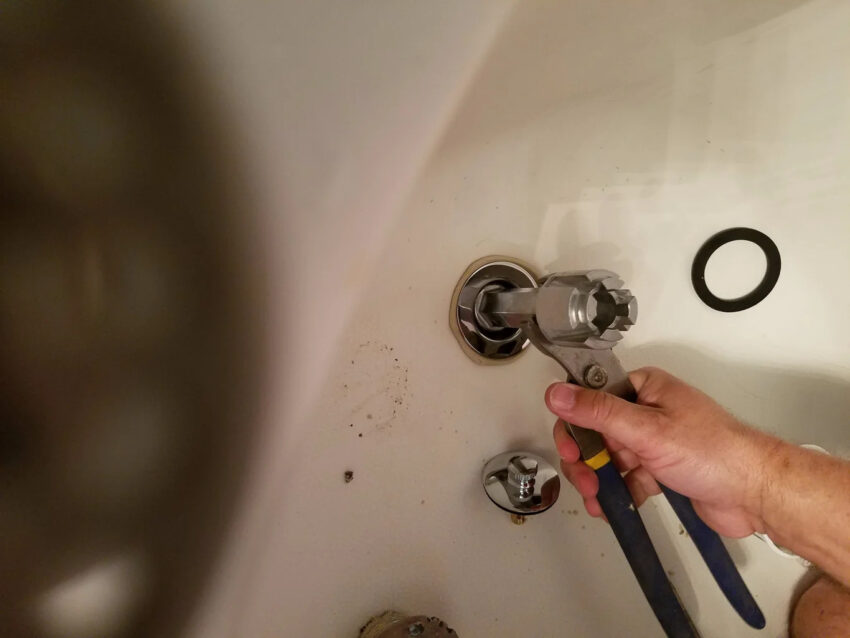
- Accessing the drain assembly
With the overflow plate removed, you’ll now have access to the drain assembly. Look into the overflow hole and locate the drain body, which is connected to the drainpipe. It may be visible or covered by a layer of putty or sealant.
- Loosening the drain body
To remove the drain body, you’ll need to loosen it from the drainpipe. Depending on the type of drain, you may need to use pliers or a drain removal tool for this step. Insert the pliers or tool into the drain body and turn counterclockwise to loosen it. Apply steady pressure while turning until the drain body becomes loose.
- Removing the drain body
Once the drain body is loosened, you can remove it from the drainpipe. Hold onto the pliers or tool and continue turning counterclockwise until the drain body is completely unscrewed. Carefully lift it out of the drainpipe, ensuring not to damage the surrounding area.
- Cleaning the drain area
With the drain body removed, take this opportunity to clean the drain area thoroughly. Use a putty knife or scraper to remove any old putty, sealant, or debris from the drainpipe and surrounding surfaces. Cleaning the area will help ensure a proper seal when installing a new drain, if necessary.
- Installing a new drain, if necessary
If you’re replacing the old drain with a new one, follow the manufacturer’s instructions for installation. Apply plumber’s tape or sealant to the threads of the new drain body to create a watertight seal. Insert the new drain body into the drainpipe and use pliers or a drain wrench to tighten it clockwise until it’s secure.
Troubleshooting Tips
During the tub drain removal process, you may encounter certain challenges. Here are a few troubleshooting tips to help you overcome common issues:
- If the drain is stuck and won’t come out, try applying penetrating oil to the threads and let it sit for a while. This will help loosen any stubborn debris or rust.
- If the drain is still difficult to remove, you can use a drain removal tool specifically designed for this purpose. These tools provide extra leverage and grip to make the removal easier.
- In some cases, the drain may have corroded or fused with the drainpipe. If this happens, you may need to consult a professional plumber to safely remove and replace the drain.
Maintenance and Care
To prevent future clogs and maintain a healthy drain system, it’s essential to perform regular maintenance. Here are a few tips to keep your tub drain in optimal condition:
- Avoid pouring harsh chemicals down the drain as they can damage the pipes and lead to clogs. Instead, use natural drain cleaners or a mixture of baking soda and vinegar to keep the drain clean.
- Regularly remove hair and debris from the drain stopper and the surrounding area to prevent buildup.
- Use a drain strainer or screen to catch hair and larger particles before they enter the drain.
- Once a month, pour boiling water down the drain to help dissolve any minor clogs and keep the pipes clear.
- If you notice slow drainage, use a plunger to try and dislodge any blockages. Apply firm but gentle pressure to create suction and remove the obstruction.
- Consider scheduling professional drain cleaning or maintenance every few years to ensure the optimal functioning of your tub drain.
Taking these maintenance steps will help prevent future issues and keep your tub drain flowing smoothly.
Conclusion
Knowing how to remove a tub drain is a valuable skill that can save you time and money. By following the step-by-step guide provided, you can confidently tackle this task on your own. Remember to prioritize safety, gather the necessary tools and materials, and follow each step carefully.
Regular maintenance and care of your tub drain will ensure its longevity and prevent clogs. By adopting good practices, such as using natural drain cleaners, removing debris, and performing routine maintenance, you can keep your tub drain functioning optimally for years to come.
So, don’t hesitate to take action and try removing your tub drain yourself. With the right knowledge and a bit of effort, you can successfully complete this task and enjoy a smoothly running bathtub.
You may like to read What Does Liv Golf Stand For: The Power of Women’s Golf